Industrial
A-100NV
Installation
What’s in the Box
The A-100NV Pump is shipped with the following contents:
- A-100NV Peristaltic Metering Pump
- Two tube assemblies (1 installed, 1 spare)
- Discharge injection fitting with check valve
- Suction tube – clear PVC – 5′ length (3/8″ OD, 1/4″ ID)
- Suction strainer
- Suction ceramic weight
- Discharge tube – opaque polyethylene – 5′ length (3/8″ OD, 1/4″ ID)
- Mounting hardware kit
- Shroud (weather proof cover)
- Power Cord (if ordered)
Preparation
The A-100NV Pump is designed to withstand outdoor conditions, although it is recommended to locate the pump in a protected enclosure for maximum pump life. A cool, dry location where the unit can be easily monitored is recommended.
The pump can be mounted on a level, flat surface, or the pump can be wall-mounted. Blue-White also offers a sturdy polyethylene (PE) <a href="https://www.blue-white.com/product/wall-mount-kit-1-2-3-4-series/" target="_blank" rel="noreferrer noopener">Wall Shelf</a> to mount the pump.
Piping and Physical Installation
The A-100NV Pump must be level to ensure pumping accuracy.
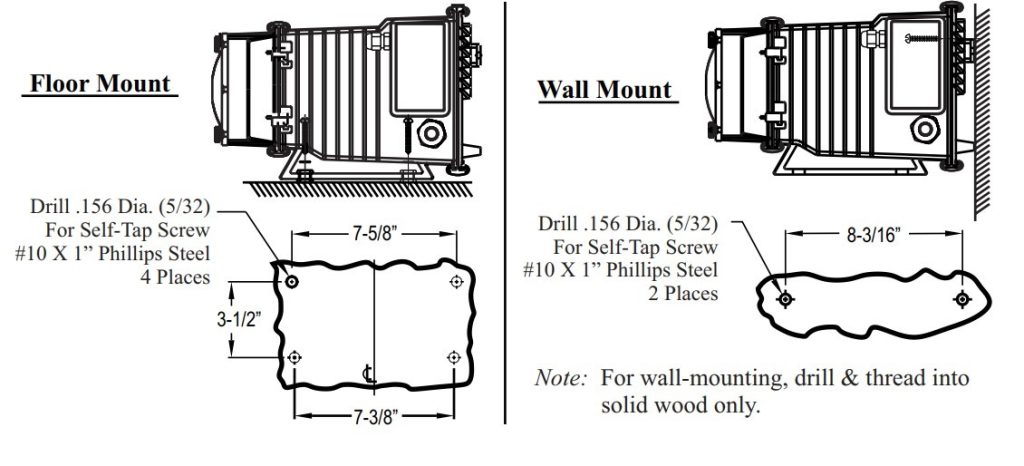
If mounting the pump to the wall using the provided wall bracket, follow these instructions:
- Use the diagram and drawing on the manual (or below) to mount the bracket to a secure wall location. We recommend mounting the pump at a height where the display and indicator lights are easily visible, and where it can be easily serviced.
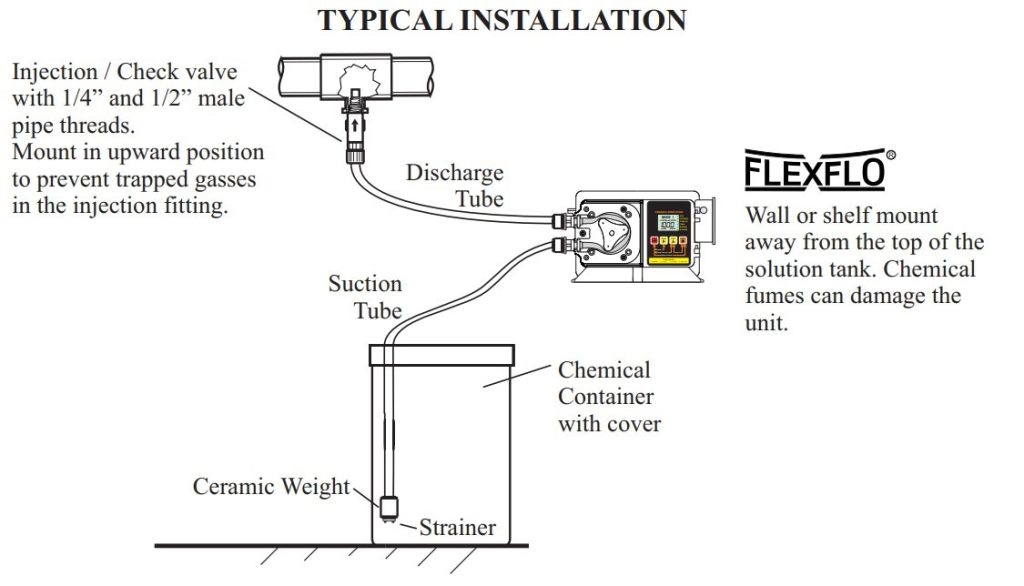
- Mount the pump close to the injection point.
- Mount the pump to the side or lower than the chemical tank.
- Mounting the pump lower than the chemical container will gravity feed the chemical into the pump. This “flooded suction” installation will reduce output error due to increased suction lift. You must install a shut-off valve, pinch clamp or other means to halt the gravity feed to the pump during servicing.

Connecting Suction and Discharge Tubing/Piping
A-100NV Pump tube elements have 1/4’” x 3/8” tubing connections (designated by “T” in the pump or tubing part number.)
The pump will come with suction and discharge tubing, suction strainer, and discharge injection valve.
Before connecting the tubing to the pump, be sure the pump is OFF. Wear protective clothing and eye protection when connecting tubing to chemicals or chemical lines.
Connect the suction tubing to the pump, and place and secure the other end of suction tubing in the chemical tank/source. Using the provided foot valve/strainer and weight is recommended.
Connect the discharge tubing to the pump and then connect the other end to the discharge point. If using the provided injection valve, be sure to mount it in an upward position to prevent air bubbles from collecting.

Note: We highly recommend installing a check valve on the discharge side of the pump. The check valve can be in the form of an injection check valve, in-line check valve, quick disconnect check valve, or similar. When there is a tube leak, the check valve will prevent chemicals from the discharge line from continually feeding into the pump head.
Wiring
Power Wiring
The A-100NV can be powered by the following power sources:
- 115VAC/60Hz, 1ph (.350 amp max)
- 230VAC/60Hz, 1ph (.173 amp max)
- 220VAC/50Hz, 1ph (.175 amp max)
- 240VAC/50Hz, 1ph (.193 amp max)
Use the provided 6’ power cord or an appropriately protected IEC C13 cord rated at 250 volts.
- Be sure to connect the pump to the proper supply voltage. Using the incorrect voltage will damage the pump and may result in injury. The voltage requirement is printed on the pump serial label.
- Jumper pins on the circuit board are factory preset for the correct voltage. See Circuit Board Connections diagram for details.
- The pump is supplied with a ground wire conductor and a grounding-type attachment plug (power cord). To reduce the risk of electric shock, be sure that the power cord is connected only to a properly grounded, grounding-type receptacle
- Note: When in doubt regarding your electrical installation, contact a licensed electrician.
Optional Signal Wiring
The pump includes three optional external signal connections:
.
See the below Wiring Chart for information and specifications in connecting to your electrical and control system.


When wiring Open Collector Motor On Output, refer to the below schematics:

Refer to the instructions in the manual for detailed information.
- Ask me a question!
